A Short Anatomy of My Star Wars Painting: Lord Vader’s Persuasion
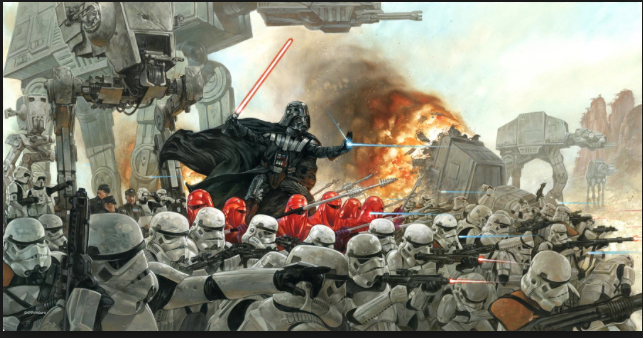
Dave Dorman’s Star Wars Painting: Lord Vader’s Persuasion of the Outer Rim
I’d like to take a moment to clear up some misconceptions and explain my thoughts on creating my painting “Lord Vader’s Persuasion…” The main reason for creating this piece was to show Vader leading his troops into battle. I wanted to actually show him in the midst of his beloved 501st Squad, being the leader he was born to be. This was not a scene we were able to see in the films themselves, and obviously, it would be a scene taking place between Episodes 3 and 4. This art has caught the imagination of Star Wars fans around the world, and has inspired me to create other scenes capturing potential story elements that were not in the screenplays, but are part of the canon of the Star Wars history.
The two most confusing elements of Lord Vader’s Persuasion are the inclusion of the Imperial Guards (the red armored figures surrounding Vader) and the fact that Vader is rising above the squad. The Imperial Guards were introduced in Episode 6 as visual elements in the background, in scenes featuring the Emperor and Lord Vader. They are not exclusively the Emperor’s private, but the elite of the Imperial forces used to protect those of the highest power. So the Imperial Guard would certainly be on hand to protect a high value target such as Vader during an invasion operation. Vader’s loyal 501st troops form a phalanx around them, always pushing forward towards Victory!
Why is Vader above the troops? He is not on a hoverboard, nor is he standing on a trooper’s shoulders! We know from the end of Episode 3 that Anakin/Vader is fearless in carrying out the Emperor’s order. Why would Vader not be fearless in leading his Troops into battle? Like any commander worthy of his troops’ respect, he will join them in battle. And as a powerful leading figure, he will not hide behind his troops, but will be where they can see him and be inspired by him. During the course of the battle, Vader uses the FORCE to levitate himself above the fray, leading and directing his troops ever forward, knowing he will become the primary target of his opponents. He is unafraid because he uses the power of The Force for protection.
I have also taken an artistic license and compacted the field of battle so that I could show a few other elements that would be involved in this type of skirmish. The officers and scouts to the far left would not so close to the battlefield in a real situation, and the ATAT/ATSTs would not be so packed together. But the art I wanted to create would show the full impact of all elements of the Imperial Forces, so I pulled a few visual tricks out of my creative hat.
Aesthetic Placement of Elements in the Art: Speaking artistically about the art, there are reasons I put elements where they are in the art. As you can see, there is an explanation for what is the battle scene from a “warfare” point of view. But to paint what I wanted, I had to have both an “Artistic” reason and a “Realism” reason. When laying out the the art, the first thing I noticed artistically was that the piece was primarily black and white. Black and greys in the Vader figure and white and greys in the trooper armor. I found working the Imperial guard into the piece not only added a focusing element, to bring your eye towards the main element–Vader–but also added that bold stroke of color I needed. That red would eventually tie in with the red of Vader’s lightsaber and the red/oranges of the explosions in the background. With that element of red, it was no longer necessary to add another bold statement of color, because the contrast of the dark figure of Vader made him the focus against the whites and the greys of the rest of the piece.
One Last Visual Element to Note: There is one last visual element that you may not see right off, but if you look closely at the art and let your eye roam, you will probably focus on Vader first, then follow the line of his arm and hand deflecting the blasterbolt. Your eye will follow the red of the ATAT explosion and smoke back over Vader, then follow the path of his Lightsaber back down to the far left of the art, now seeing the Officers and Scouts. As your eye follows where they are looking, it catches the front-most Stormtrooper with his arm raised, pointing the troopers forward. We follow that line through the bottom of the art into the field of troopers. From here, the curve upward of the red and blue blasterbolts brings the eye back up to the exploding ATAT in the background and then right back to Vader.
There was much more that went into this piece and the contribution of the 501st Midwest Garrison in helping me shoot reference for this cannot be overstated. But this should help you understand a bit of what is going through my head when creating a piece of art.
A special thanks to Jesus Diaz of the SPLOID column for Gizmodo who wrote this piece today about my Star Wars art (including Lord Vader’s Persuasion):
Thank you, Jesus Diaz!
and to writer Marlon McDonald of MoviePilot.com who wrote this article today as well:
Thank you, Marlon McDonald!
Thanks for reading!

February 10, 2015 at 6:07 pm
Great writeup! Now I can appreciate my print that much more Dave. Thanks!
February 10, 2015 at 8:13 pm
“the contribution of the 501st Midwest Garrison in helping me shoot reference for this cannot be understated.” I think you mean “cannot be overstated”?
February 11, 2015 at 2:58 am
Fixed it – thank you!